web应用系统
- 创建web workspace,

- 准备repo,点击"prepare reposity",这样可以加速编译.
A. 对于高校版本的学生,如果你的服务端(不是你的本地计算机这端)没有外网,请下载本案例的离线reposity。
1). 当你的服务端部署了文件服务器
参考手册http://man.kinginsai.com/ --> She平台课程环境详细操作说明中的文件服务器说明,
找到Cloud/example1/repository.tar.gz,
然后获取此文件的链接地址(She C端版本为http://archive.dev.kinginsai.com/Cloud/example1/repository.tar.gz),
然后下载到tools容器的/tmp目录下替换已经存在的repository.tar.gz,下载完成后再点击"prepare reposity",

注意,通常高校版本的服务端和She C端版本之间的网络是不通的,因此不能直接使用这个地址(http://archive.dev.kinginsai.com/Cloud/example1/repository.tar.gz).
2). 当你的服务端没有部署文件服务器,你可以通过下载She C端版本的repository.tar.gz(http://archive.dev.kinginsai.com/Cloud/example1/repository.tar.gz),然后上传到对应位置。
详细操作过程参见以下视频,
B. 对于She C端版本的用户,不需要进行上一步的操作,因为She C端版本的服务端网络非常好。
C. 由于更新了Java工程代码,在tools容器的/tmp目录下已经存在的repository.tar.gz的基础上还需要从maven仓库中下载新的pom。
- 打开任一java文件,让工程准备好,这样可以进行符号跳转等

- 修改WelcomeController.java文件,将
	@GetMapping("/")
	public String welcome() {
		return "welcome";
	}
替换成,
	@Value("${app.id}")
	private String appId;

	@GetMapping("/")
	public ModelAndView welcome() {
		ModelAndView mv = new ModelAndView();
		mv.setViewName("welcome");
		mv.addObject("welcome", "Welcome = " + appId);
		return mv;
	}
分别在符号Value和ModelAndView停留鼠标、并点击出现的"Quick Fix"、然后点击"Import ..."

- 在application.properties文件尾部增加
server.port=8080
app.id=1
并将
database=h2
改成
database=mysql

- 修改application-mysql.properties
将
spring.datasource.username=petclinic
改成
spring.datasource.username=root
- 修改welcome.html
<h2 th:text="#{welcome}">Welcome</h2>
替换成,
<h2 th:text="${welcome}"></h2>
-
点击tools的maven build
-
build完成后先后点击mysql的prepare database、tools的run webapp运行工程并测试
详细操作过程参见以下视频,
关于工程代码的详细讲解,请参考She平台手册中"快速了解-通过Java Web案例介绍She平台"。
docker与虚拟化


What is a container?
Simply put, a container is a sandboxed process on your machine that is isolated from all other processes on the host machine. That isolation leverages kernel namespaces and cgroups, features that have been in Linux for a long time. Docker has worked to make these capabilities approachable and easy to use. To summarize, a container:
-
Is a runnable instance of an image. You can create, start, stop, move, or delete a container using the DockerAPI or CLI.
-
Can be run on local machines, virtual machines or deployed to the cloud.
-
Is portable (can be run on any OS).
-
Is isolated from other containers and runs its own software, binaries, and configurations.
What is a container image?
When running a container, it uses an isolated filesystem. This custom filesystem is provided by a container image. Since the image contains the container’s filesystem, it must contain everything needed to run an application - all dependencies, configurations, scripts, binaries, etc. The image also contains other configuration for the container, such as environment variables, a default command to run, and other metadata.
docker与虚拟化
What is a container?
Simply put, a container is a sandboxed process on your machine that is isolated from all other processes on the host machine. That isolation leverages kernel namespaces and cgroups, features that have been in Linux for a long time. Docker has worked to make these capabilities approachable and easy to use. To summarize, a container:
-
Is a runnable instance of an image. You can create, start, stop, move, or delete a container using the DockerAPI or CLI.
-
Can be run on local machines, virtual machines or deployed to the cloud.
-
Is portable (can be run on any OS).
-
Is isolated from other containers and runs its own software, binaries, and configurations.
What is a container image?
When running a container, it uses an isolated filesystem. This custom filesystem is provided by a container image. Since the image contains the container’s filesystem, it must contain everything needed to run an application - all dependencies, configurations, scripts, binaries, etc. The image also contains other configuration for the container, such as environment variables, a default command to run, and other metadata.
web应用系统
- 创建web workspace,
- 准备repo,点击"prepare reposity",这样可以加速编译.
A. 对于高校版本的学生,如果你的服务端(不是你的本地计算机这端)没有外网,请下载本案例的离线reposity。
1). 当你的服务端部署了文件服务器
参考手册http://man.kinginsai.com/ --> She平台课程环境详细操作说明中的文件服务器说明,
找到Cloud/example1/repository.tar.gz,
然后获取此文件的链接地址(She C端版本为http://archive.dev.kinginsai.com/Cloud/example1/repository.tar.gz),
然后下载到tools容器的/tmp目录下替换已经存在的repository.tar.gz,下载完成后再点击"prepare reposity",
注意,通常高校版本的服务端和She C端版本之间的网络是不通的,因此不能直接使用这个地址(http://archive.dev.kinginsai.com/Cloud/example1/repository.tar.gz).
2). 当你的服务端没有部署文件服务器,你可以通过下载She C端版本的repository.tar.gz(http://archive.dev.kinginsai.com/Cloud/example1/repository.tar.gz),然后上传到对应位置。
详细操作过程参见以下视频,
B. 对于She C端版本的用户,不需要进行上一步的操作,因为She C端版本的服务端网络非常好。
C. 由于更新了Java工程代码,在tools容器的/tmp目录下已经存在的repository.tar.gz的基础上还需要从maven仓库中下载新的pom。
- 打开任一java文件,让工程准备好,这样可以进行符号跳转等
- 修改WelcomeController.java文件,将
	@GetMapping("/")
	public String welcome() {
		return "welcome";
	}
替换成,
	@Value("${app.id}")
	private String appId;

	@GetMapping("/")
	public ModelAndView welcome() {
		ModelAndView mv = new ModelAndView();
		mv.setViewName("welcome");
		mv.addObject("welcome", "Welcome = " + appId);
		return mv;
	}
分别在符号Value和ModelAndView停留鼠标、并点击出现的"Quick Fix"、然后点击"Import ..."
- 在application.properties文件尾部增加
server.port=8080
app.id=1
并将
database=h2
改成
database=mysql
- 修改application-mysql.properties
将
spring.datasource.username=petclinic
改成
spring.datasource.username=root
- 修改welcome.html
<h2 th:text="#{welcome}">Welcome</h2>
替换成,
<h2 th:text="${welcome}"></h2>
-
点击tools的maven build
-
build完成后先后点击mysql的prepare database、tools的run webapp运行工程并测试
详细操作过程参见以下视频,
关于工程代码的详细讲解,请参考She平台手册中"快速了解-通过Java Web案例介绍She平台"。
基于docker容器的部署
-
创建Ubuntu18TextVMI(参考手册http://man.kinginsai.com/ --> 创建windows和Linux虚拟机 --> 创建Linux虚拟机(命令行模式,xshell/securecrt远程连接))
-
等待Ubuntu18TextVMI主机正常运行后(创建完成不等于正常运行,参考手册http://man.kinginsai.com/ --> 创建windows和Linux虚拟机),在web workspace中将编译的java包拷贝到Ubuntu18TextVMI主机

- 创建tools workspace,并使用"she tools"的方式连接Ubuntu18TextVMI主机


- 在Ubuntu18TextVMI主机中进行以下操作
1). 在~/目录下创建petclinic目录: mkdir petclinic, 然后 cd petclinic
2). touch Dockerfile
3). 在Dockerfile中输入以下内容
FROM openjdk:8u232-jre-slim

ENV app_id "1"
ENV spring_datasource_username "root"
ENV spring_datasource_password "Yhf@1018"
ENV database_url "jdbc:mysql://localhost:3306/petclinic"

COPY ./spring-petclinic-2.2.0.BUILD-SNAPSHOT.jar /opt

RUN rm -rf /etc/localtime && \
    ln -sf /usr/share/zoneinfo/Asia/Shanghai /etc/localtime && \
    printf "#! /bin/bash\nset -e\n exec \"\$@\"" > /entrypoint.sh && chmod a+x /entrypoint.sh && chmod a+x /entrypoint.sh

ENTRYPOINT ["/entrypoint.sh"]

WORKDIR /opt

CMD ["java", "-Duser.timezone=Asia/Shanghai", "-jar", "./spring-petclinic-2.2.0.BUILD-SNAPSHOT.jar", \
"--spring.datasource.username=${spring_datasource_username}", \
"--spring.datasource.password=${spring_datasource_password}", \
"--spring.datasource.url=${database_url}", \
"--app.id=${app_id}"]
4). cp ../spring-petclinic-2.2.0.BUILD-SNAPSHOT.jar ./
5). docker build --network=host --no-cache -t r.kinginsai.com/petclinic:7.8.0 .
注意:最后有一个英文的句号。
如果你的服务端没有外网条件,请按照repository.tar.gz的办法找到"openjdk_8u232-jre-slim.tar"并上传到web workspace中, 然后使用"将编译的java包拷贝到Ubuntu18TextVMI主机"的方式上传到Ubuntu18TextVMI主机,然后使用docker load -i openjdk_8u232-jre-slim.tar加载openjdk:8u232-jre-slim镜像
详细操作过程参见以下视频,
6). docker images | grep r.kinginsai 查看r.kinginsai.com/petclinic:7.8.0镜像的情况
7). 运行mysql容器(如果你的服务端没有外网条件,请加载mysql_5.7-debian.tar)
docker run -d --name mysql --restart=always -e MYSQL_ROOT_PASSWORD=Yhf@1018 mysql:5.7-debian
8). 运行docker inspect -f {{.State.Running}} mysql 查看mysql容器运行状态,结果为true证明mysql容器运行完成
9). 执行mysql数据库初始化:
docker exec mysql sh -c 'mysql -uroot -p"Yhf@1018" -e "CREATE DATABASE IF NOT EXISTS petclinic;"'
如果出现
ERROR 2002 (HY000): Can't connect to local MySQL server through socket '/var/run/mysqld/mysqld.sock' (2)
或者
ERROR 1045 (28000): Access denied for user 'root'@'localhost' (using password: YES)
请等待一会后再次执行,直到执行成功为止。
docker exec mysql sh -c 'mysql -uroot -p"Yhf@1018" -e "ALTER DATABASE petclinic DEFAULT CHARACTER SET utf8 DEFAULT COLLATE utf8_general_ci;"'
执行过程如下,
root@ssxy:~# docker exec mysql sh -c 'mysql -uroot -p"Yhf@1018" -e "CREATE DATABASE IF NOT EXISTS petclinic;"'
mysql: [Warning] Using a password on the command line interface can be insecure.
ERROR 2002 (HY000): Can't connect to local MySQL server through socket '/var/run/mysqld/mysqld.sock' (2)
root@ssxy:~# docker exec mysql sh -c 'mysql -uroot -p"Yhf@1018" -e "CREATE DATABASE IF NOT EXISTS petclinic;"'
mysql: [Warning] Using a password on the command line interface can be insecure.
root@ssxy:~# docker exec mysql sh -c 'mysql -uroot -p"Yhf@1018" -e "ALTER DATABASE petclinic DEFAULT CHARACTER SET utf8 DEFAULT COLLATE utf8_general_ci;"'
mysql: [Warning] Using a password on the command line interface can be insecure.
root@ssxy:~#
10). 启动petclinic容器
ip=$(docker inspect --format '{{ .NetworkSettings.IPAddress }}' mysql)
docker run -d --name petclinic -p 8080:8080 --restart=always -e spring.profiles.active=mysql -e spring_datasource_password=Yhf@1018 -e database_url="jdbc:mysql://$ip:3306/petclinic" r.kinginsai.com/petclinic:7.8.0
其中,"-p 8080:8080"中的第一个8080代表宿主机的端口,第二个8080代表容器的端口
11). docker logs -f petclinic 查看petclinic启动过程,并等待初始化完成(ctrl + c可退出)

如果遇到出错,可通过 docker stop petclinic、docker rm petclinic 删除容器
12). 点击tools-dev中tools按钮,并打开chrome浏览器,输入Ubuntu18TextVMI主机:8080打开web界面

- reboot Ubuntu18TextVMI主机,再次打开web界面 + docker logs -f petclinic 查看情况
详细操作过程参见以下视频,
常见问题及其解决方案
- 在"启动petclinic容器"时,使用docker logs -f petclinic出现以下日志信息,
              |\      _,,,--,,_
             /,`.-'`'   ._  \-;;,_
  _______ __|,4-  ) )_   .;.(__`'-'__     ___ __    _ ___ _______
 |       | '---''(_/._)-'(_\_)   |   |   |   |  |  | |   |       |
 |    _  |    ___|_     _|       |   |   |   |   |_| |   |       | __ _ _
 |   |_| |   |___  |   | |       |   |   |   |       |   |       | \ \ \ \
 |    ___|    ___| |   | |      _|   |___|   |  _    |   |      _|  \ \ \ \
 |   |   |   |___  |   | |     |_|       |   | | |   |   |     |_    ) ) ) )
 |___|   |_______| |___| |_______|_______|___|_|  |__|___|_______|  / / / /
 ==================================================================/_/_/_/

:: Built with Spring Boot :: 2.2.5.RELEASE


2023-07-28 09:52:27.492  INFO 1 --- [           main] o.s.s.petclinic.PetClinicApplication     : Starting PetClinicApplication v2.2.0.BUILD-SNAPSHOT on ca1af1ea720b with PID 1 (/opt/spring-petclinic-2.2.0.BUILD-SNAPSHOT.jar started by root in /opt)
2023-07-28 09:52:27.685  INFO 1 --- [           main] o.s.s.petclinic.PetClinicApplication     : The following profiles are active: mysql
2023-07-28 09:53:00.401  INFO 1 --- [           main] .s.d.r.c.RepositoryConfigurationDelegate : Bootstrapping Spring Data JPA repositories in DEFAULT mode.
2023-07-28 09:53:02.327  INFO 1 --- [           main] .s.d.r.c.RepositoryConfigurationDelegate : Finished Spring Data repository scanning in 1607ms. Found 4 JPA repository interfaces.
2023-07-28 09:53:30.393  INFO 1 --- [           main] o.s.b.w.embedded.tomcat.TomcatWebServer  : Tomcat initialized with port(s): 8080 (http)
2023-07-28 09:53:30.709  INFO 1 --- [           main] o.apache.catalina.core.StandardService   : Starting service [Tomcat]
2023-07-28 09:53:30.716  INFO 1 --- [           main] org.apache.catalina.core.StandardEngine  : Starting Servlet engine: [Apache Tomcat/9.0.31]
2023-07-28 09:53:32.764  INFO 1 --- [           main] o.a.c.c.C.[Tomcat].[localhost].[/]       : Initializing Spring embedded WebApplicationContext
2023-07-28 09:53:32.782  INFO 1 --- [           main] o.s.web.context.ContextLoader            : Root WebApplicationContext: initialization completed in 63478 ms
2023-07-28 09:53:44.892  INFO 1 --- [           main] org.ehcache.core.EhcacheManager          : Cache 'vets' created in EhcacheManager.
2023-07-28 09:53:45.253  INFO 1 --- [           main] org.ehcache.jsr107.Eh107CacheManager     : Registering Ehcache MBean javax.cache:type=CacheStatistics,CacheManager=urn.X-ehcache.jsr107-default-config,Cache=vets
2023-07-28 09:53:45.472  INFO 1 --- [           main] org.ehcache.jsr107.Eh107CacheManager     : Registering Ehcache MBean javax.cache:type=CacheStatistics,CacheManager=urn.X-ehcache.jsr107-default-config,Cache=vets
2023-07-28 09:53:47.720  INFO 1 --- [           main] com.zaxxer.hikari.HikariDataSource       : HikariPool-1 - Starting...
2023-07-28 09:53:59.450  INFO 1 --- [           main] com.zaxxer.hikari.HikariDataSource       : HikariPool-1 - Start completed.
2023-07-28 09:54:17.284  INFO 1 --- [           main] o.hibernate.jpa.internal.util.LogHelper  : HHH000204: Processing PersistenceUnitInfo [name: default]
2023-07-28 09:54:20.825  INFO 1 --- [           main] org.hibernate.Version                    : HHH000412: Hibernate ORM core version 5.4.12.Final
2023-07-28 09:54:24.185  INFO 1 --- [           main] o.hibernate.annotations.common.Version   : HCANN000001: Hibernate Commons Annotations {5.1.0.Final}
2023-07-28 09:54:26.509  INFO 1 --- [           main] org.hibernate.dialect.Dialect            : HHH000400: Using dialect: org.hibernate.dialect.MySQL57Dialect
2023-07-28 09:54:51.475  INFO 1 --- [           main] o.h.e.t.j.p.i.JtaPlatformInitiator       : HHH000490: Using JtaPlatform implementation: [org.hibernate.engine.transaction.jta.platform.internal.NoJtaPlatform]
2023-07-28 09:54:51.702  INFO 1 --- [           main] j.LocalContainerEntityManagerFactoryBean : Initialized JPA EntityManagerFactory for persistence unit 'default'
2023-07-28 09:55:01.828  WARN 1 --- [           main] ConfigServletWebServerApplicationContext : Exception encountered during context initialization - cancelling refresh attempt: org.springframework.beans.factory.UnsatisfiedDependencyException: Error creating bean with name 'ownerController' defined in URL [jar:file:/opt/spring-petclinic-2.2.0.BUILD-SNAPSHOT.jar!/BOOT-INF/classes!/org/springframework/samples/petclinic/owner/OwnerController.class]: Unsatisfied dependency expressed through constructor parameter 0; nested exception is org.springframework.beans.factory.BeanCreationException: Error creating bean with name 'ownerRepository': Invocation of init method failed; nested exception is java.lang.IllegalStateException: Using named parameters for method public abstract java.util.Collection org.springframework.samples.petclinic.owner.OwnerRepository.findByLastName(java.lang.String) but parameter 'Optional[lastName]' not found in annotated query 'SELECT DISTINCT owner FROM Owner owner left join fetch owner.pets WHERE owner.lastName LIKE :lastName%'!
2023-07-28 09:55:01.870  INFO 1 --- [           main] j.LocalContainerEntityManagerFactoryBean : Closing JPA EntityManagerFactory for persistence unit 'default'
2023-07-28 09:55:01.923  INFO 1 --- [           main] com.zaxxer.hikari.HikariDataSource       : HikariPool-1 - Shutdown initiated...
2023-07-28 09:55:02.157  INFO 1 --- [           main] com.zaxxer.hikari.HikariDataSource       : HikariPool-1 - Shutdown completed.
2023-07-28 09:55:02.383  INFO 1 --- [           main] org.ehcache.core.EhcacheManager          : Cache 'vets' removed from EhcacheManager.
2023-07-28 09:55:02.557  INFO 1 --- [           main] o.apache.catalina.core.StandardService   : Stopping service [Tomcat]
2023-07-28 09:55:02.970  INFO 1 --- [           main] ConditionEvaluationReportLoggingListener :

Error starting ApplicationContext. To display the conditions report re-run your application with 'debug' enabled.
2023-07-28 09:55:03.115 ERROR 1 --- [           main] o.s.boot.SpringApplication               : Application run failed

org.springframework.beans.factory.UnsatisfiedDependencyException: Error creating bean with name 'ownerController' defined in URL [jar:file:/opt/spring-petclinic-2.2.0.BUILD-SNAPSHOT.jar!/BOOT-INF/classes!/org/springframework/samples/petclinic/owner/OwnerController.class]: Unsatisfied dependency expressed through constructor parameter 0; nested exception is org.springframework.beans.factory.BeanCreationException: Error creating bean with name 'ownerRepository': Invocation of init method failed; nested exception is java.lang.IllegalStateException: Using named parameters for method public abstract java.util.Collection org.springframework.samples.petclinic.owner.OwnerRepository.findByLastName(java.lang.String) but parameter 'Optional[lastName]' not found in annotated query 'SELECT DISTINCT owner FROM Owner owner left join fetch owner.pets WHERE owner.lastName LIKE :lastName%'!
        at org.springframework.beans.factory.support.ConstructorResolver.createArgumentArray(ConstructorResolver.java:798) ~[spring-beans-5.2.4.RELEASE.jar!/:5.2.4.RELEASE]
        at org.springframework.beans.factory.support.ConstructorResolver.autowireConstructor(ConstructorResolver.java:228) ~[spring-beans-5.2.4.RELEASE.jar!/:5.2.4.RELEASE]
        at org.springframework.beans.factory.support.AbstractAutowireCapableBeanFactory.autowireConstructor(AbstractAutowireCapableBeanFactory.java:1358) ~[spring-beans-5.2.4.RELEASE.jar!/:5.2.4.RELEASE]
        at org.springframework.beans.factory.support.AbstractAutowireCapableBeanFactory.createBeanInstance(AbstractAutowireCapableBeanFactory.java:1204) ~[spring-beans-5.2.4.RELEASE.jar!/:5.2.4.RELEASE]
        at org.springframework.beans.factory.support.AbstractAutowireCapableBeanFactory.doCreateBean(AbstractAutowireCapableBeanFactory.java:557) ~[spring-beans-5.2.4.RELEASE.jar!/:5.2.4.RELEASE]
        at org.springframework.beans.factory.support.AbstractAutowireCapableBeanFactory.createBean(AbstractAutowireCapableBeanFactory.java:517) ~[spring-beans-5.2.4.RELEASE.jar!/:5.2.4.RELEASE]
        at org.springframework.beans.factory.support.AbstractBeanFactory.lambda$doGetBean$0(AbstractBeanFactory.java:323) ~[spring-beans-5.2.4.RELEASE.jar!/:5.2.4.RELEASE]
        at org.springframework.beans.factory.support.DefaultSingletonBeanRegistry.getSingleton(DefaultSingletonBeanRegistry.java:222) ~[spring-beans-5.2.4.RELEASE.jar!/:5.2.4.RELEASE]
        at org.springframework.beans.factory.support.AbstractBeanFactory.doGetBean(AbstractBeanFactory.java:321) ~[spring-beans-5.2.4.RELEASE.jar!/:5.2.4.RELEASE]
        at org.springframework.beans.factory.support.AbstractBeanFactory.getBean(AbstractBeanFactory.java:202) ~[spring-beans-5.2.4.RELEASE.jar!/:5.2.4.RELEASE]
        at org.springframework.beans.factory.support.DefaultListableBeanFactory.preInstantiateSingletons(DefaultListableBeanFactory.java:879) ~[spring-beans-5.2.4.RELEASE.jar!/:5.2.4.RELEASE]
        at org.springframework.context.support.AbstractApplicationContext.finishBeanFactoryInitialization(AbstractApplicationContext.java:878) ~[spring-context-5.2.4.RELEASE.jar!/:5.2.4.RELEASE]
        at org.springframework.context.support.AbstractApplicationContext.refresh(AbstractApplicationContext.java:550) ~[spring-context-5.2.4.RELEASE.jar!/:5.2.4.RELEASE]
        at org.springframework.boot.web.servlet.context.ServletWebServerApplicationContext.refresh(ServletWebServerApplicationContext.java:141) ~[spring-boot-2.2.5.RELEASE.jar!/:2.2.5.RELEASE]
        at org.springframework.boot.SpringApplication.refresh(SpringApplication.java:747) [spring-boot-2.2.5.RELEASE.jar!/:2.2.5.RELEASE]
        at org.springframework.boot.SpringApplication.refreshContext(SpringApplication.java:397) [spring-boot-2.2.5.RELEASE.jar!/:2.2.5.RELEASE]
        at org.springframework.boot.SpringApplication.run(SpringApplication.java:315) [spring-boot-2.2.5.RELEASE.jar!/:2.2.5.RELEASE]
        at org.springframework.boot.SpringApplication.run(SpringApplication.java:1226) [spring-boot-2.2.5.RELEASE.jar!/:2.2.5.RELEASE]
        at org.springframework.boot.SpringApplication.run(SpringApplication.java:1215) [spring-boot-2.2.5.RELEASE.jar!/:2.2.5.RELEASE]
        at org.springframework.samples.petclinic.PetClinicApplication.main(PetClinicApplication.java:32) [classes!/:2.2.0.BUILD-SNAPSHOT]
        at sun.reflect.NativeMethodAccessorImpl.invoke0(Native Method) ~[na:1.8.0_232]
        at sun.reflect.NativeMethodAccessorImpl.invoke(NativeMethodAccessorImpl.java:62) ~[na:1.8.0_232]
        at sun.reflect.DelegatingMethodAccessorImpl.invoke(DelegatingMethodAccessorImpl.java:43) ~[na:1.8.0_232]
        at java.lang.reflect.Method.invoke(Method.java:498) ~[na:1.8.0_232]
        at org.springframework.boot.loader.MainMethodRunner.run(MainMethodRunner.java:48) [spring-petclinic-2.2.0.BUILD-SNAPSHOT.jar:2.2.0.BUILD-SNAPSHOT]
        at org.springframework.boot.loader.Launcher.launch(Launcher.java:87) [spring-petclinic-2.2.0.BUILD-SNAPSHOT.jar:2.2.0.BUILD-SNAPSHOT]
        at org.springframework.boot.loader.Launcher.launch(Launcher.java:51) [spring-petclinic-2.2.0.BUILD-SNAPSHOT.jar:2.2.0.BUILD-SNAPSHOT]
        at org.springframework.boot.loader.JarLauncher.main(JarLauncher.java:52) [spring-petclinic-2.2.0.BUILD-SNAPSHOT.jar:2.2.0.BUILD-SNAPSHOT]
Caused by: org.springframework.beans.factory.BeanCreationException: Error creating bean with name 'ownerRepository': Invocation of init method failed; nested exception is java.lang.IllegalStateException: Using named parameters for method public abstract java.util.Collection org.springframework.samples.petclinic.owner.OwnerRepository.findByLastName(java.lang.String) but parameter 'Optional[lastName]' not found in annotated query 'SELECT DISTINCT owner FROM Owner owner left join fetch owner.pets WHERE owner.lastName LIKE :lastName%'!
        at org.springframework.beans.factory.support.AbstractAutowireCapableBeanFactory.initializeBean(AbstractAutowireCapableBeanFactory.java:1796) ~[spring-beans-5.2.4.RELEASE.jar!/:5.2.4.RELEASE]
        at org.springframework.beans.factory.support.AbstractAutowireCapableBeanFactory.doCreateBean(AbstractAutowireCapableBeanFactory.java:595) ~[spring-beans-5.2.4.RELEASE.jar!/:5.2.4.RELEASE]
        at org.springframework.beans.factory.support.AbstractAutowireCapableBeanFactory.createBean(AbstractAutowireCapableBeanFactory.java:517) ~[spring-beans-5.2.4.RELEASE.jar!/:5.2.4.RELEASE]
        at org.springframework.beans.factory.support.AbstractBeanFactory.lambda$doGetBean$0(AbstractBeanFactory.java:323) ~[spring-beans-5.2.4.RELEASE.jar!/:5.2.4.RELEASE]
        at org.springframework.beans.factory.support.DefaultSingletonBeanRegistry.getSingleton(DefaultSingletonBeanRegistry.java:222) ~[spring-beans-5.2.4.RELEASE.jar!/:5.2.4.RELEASE]
        at org.springframework.beans.factory.support.AbstractBeanFactory.doGetBean(AbstractBeanFactory.java:321) ~[spring-beans-5.2.4.RELEASE.jar!/:5.2.4.RELEASE]
        at org.springframework.beans.factory.support.AbstractBeanFactory.getBean(AbstractBeanFactory.java:202) ~[spring-beans-5.2.4.RELEASE.jar!/:5.2.4.RELEASE]
        at org.springframework.beans.factory.config.DependencyDescriptor.resolveCandidate(DependencyDescriptor.java:276) ~[spring-beans-5.2.4.RELEASE.jar!/:5.2.4.RELEASE]
        at org.springframework.beans.factory.support.DefaultListableBeanFactory.doResolveDependency(DefaultListableBeanFactory.java:1287) ~[spring-beans-5.2.4.RELEASE.jar!/:5.2.4.RELEASE]
        at org.springframework.beans.factory.support.DefaultListableBeanFactory.resolveDependency(DefaultListableBeanFactory.java:1207) ~[spring-beans-5.2.4.RELEASE.jar!/:5.2.4.RELEASE]
        at org.springframework.beans.factory.support.ConstructorResolver.resolveAutowiredArgument(ConstructorResolver.java:885) ~[spring-beans-5.2.4.RELEASE.jar!/:5.2.4.RELEASE]
        at org.springframework.beans.factory.support.ConstructorResolver.createArgumentArray(ConstructorResolver.java:789) ~[spring-beans-5.2.4.RELEASE.jar!/:5.2.4.RELEASE]
        ... 27 common frames omitted
Caused by: java.lang.IllegalStateException: Using named parameters for method public abstract java.util.Collection org.springframework.samples.petclinic.owner.OwnerRepository.findByLastName(java.lang.String) but parameter 'Optional[lastName]' not found in annotated query 'SELECT DISTINCT owner FROM Owner owner left join fetch owner.pets WHERE owner.lastName LIKE :lastName%'!
        at org.springframework.data.jpa.repository.query.JpaQueryMethod.assertParameterNamesInAnnotatedQuery(JpaQueryMethod.java:156) ~[spring-data-jpa-2.2.5.RELEASE.jar!/:2.2.5.RELEASE]
        at org.springframework.data.jpa.repository.query.JpaQueryMethod.<init>(JpaQueryMethod.java:135) ~[spring-data-jpa-2.2.5.RELEASE.jar!/:2.2.5.RELEASE]
        at org.springframework.data.jpa.repository.query.JpaQueryLookupStrategy$AbstractQueryLookupStrategy.resolveQuery(JpaQueryLookupStrategy.java:78) ~[spring-data-jpa-2.2.5.RELEASE.jar!/:2.2.5.RELEASE]
        at org.springframework.data.repository.core.support.RepositoryFactorySupport$QueryExecutorMethodInterceptor.lookupQuery(RepositoryFactorySupport.java:574) ~[spring-data-commons-2.2.5.RELEASE.jar!/:2.2.5.RELEASE]
        at org.springframework.data.repository.core.support.RepositoryFactorySupport$QueryExecutorMethodInterceptor.lambda$mapMethodsToQuery$1(RepositoryFactorySupport.java:567) ~[spring-data-commons-2.2.5.RELEASE.jar!/:2.2.5.RELEASE]
        at java.util.stream.ReferencePipeline$3$1.accept(ReferencePipeline.java:193) ~[na:1.8.0_232]
        at java.util.Iterator.forEachRemaining(Iterator.java:116) ~[na:1.8.0_232]
        at java.util.Collections$UnmodifiableCollection$1.forEachRemaining(Collections.java:1051) ~[na:1.8.0_232]
        at java.util.Spliterators$IteratorSpliterator.forEachRemaining(Spliterators.java:1801) ~[na:1.8.0_232]
        at java.util.stream.AbstractPipeline.copyInto(AbstractPipeline.java:482) ~[na:1.8.0_232]
        at java.util.stream.AbstractPipeline.wrapAndCopyInto(AbstractPipeline.java:472) ~[na:1.8.0_232]
        at java.util.stream.ReduceOps$ReduceOp.evaluateSequential(ReduceOps.java:708) ~[na:1.8.0_232]
        at java.util.stream.AbstractPipeline.evaluate(AbstractPipeline.java:234) ~[na:1.8.0_232]
        at java.util.stream.ReferencePipeline.collect(ReferencePipeline.java:566) ~[na:1.8.0_232]
        at org.springframework.data.repository.core.support.RepositoryFactorySupport$QueryExecutorMethodInterceptor.mapMethodsToQuery(RepositoryFactorySupport.java:569) ~[spring-data-commons-2.2.5.RELEASE.jar!/:2.2.5.RELEASE]
        at org.springframework.data.repository.core.support.RepositoryFactorySupport$QueryExecutorMethodInterceptor.lambda$new$0(RepositoryFactorySupport.java:559) ~[spring-data-commons-2.2.5.RELEASE.jar!/:2.2.5.RELEASE]
        at java.util.Optional.map(Optional.java:215) ~[na:1.8.0_232]
        at org.springframework.data.repository.core.support.RepositoryFactorySupport$QueryExecutorMethodInterceptor.<init>(RepositoryFactorySupport.java:559) ~[spring-data-commons-2.2.5.RELEASE.jar!/:2.2.5.RELEASE]
        at org.springframework.data.repository.core.support.RepositoryFactorySupport.getRepository(RepositoryFactorySupport.java:332) ~[spring-data-commons-2.2.5.RELEASE.jar!/:2.2.5.RELEASE]
        at org.springframework.data.repository.core.support.RepositoryFactoryBeanSupport.lambda$afterPropertiesSet$5(RepositoryFactoryBeanSupport.java:297) ~[spring-data-commons-2.2.5.RELEASE.jar!/:2.2.5.RELEASE]
        at org.springframework.data.util.Lazy.getNullable(Lazy.java:212) ~[spring-data-commons-2.2.5.RELEASE.jar!/:2.2.5.RELEASE]
        at org.springframework.data.util.Lazy.get(Lazy.java:94) ~[spring-data-commons-2.2.5.RELEASE.jar!/:2.2.5.RELEASE]
        at org.springframework.data.repository.core.support.RepositoryFactoryBeanSupport.afterPropertiesSet(RepositoryFactoryBeanSupport.java:300) ~[spring-data-commons-2.2.5.RELEASE.jar!/:2.2.5.RELEASE]
        at org.springframework.data.jpa.repository.support.JpaRepositoryFactoryBean.afterPropertiesSet(JpaRepositoryFactoryBean.java:121) ~[spring-data-jpa-2.2.5.RELEASE.jar!/:2.2.5.RELEASE]
        at org.springframework.beans.factory.support.AbstractAutowireCapableBeanFactory.invokeInitMethods(AbstractAutowireCapableBeanFactory.java:1855) ~[spring-beans-5.2.4.RELEASE.jar!/:5.2.4.RELEASE]
        at org.springframework.beans.factory.support.AbstractAutowireCapableBeanFactory.initializeBean(AbstractAutowireCapableBeanFactory.java:1792) ~[spring-beans-5.2.4.RELEASE.jar!/:5.2.4.RELEASE]
        ... 38 common frames omitted
这种错误出现的原因是Ubuntu18TextVMI主机使用模拟的方式创建的、即She平台运行在没有硬件虚拟化支撑的服务器集群中。解决方法是
方案1. 在"执行mysql数据库初始化"后,即执行完
docker exec mysql sh -c 'mysql -uroot -p"Yhf@1018" -e "ALTER DATABASE petclinic DEFAULT CHARACTER SET utf8 DEFAULT COLLATE utf8_general_ci;"'
后,需要手动建表并加载数据
A. 从web workspace中拷贝schema.sql/data.sql到Ubuntu18TextVMI主机,

B. 在Ubuntu18TextVMI主机中将以上两个文件copy到mysql容器中,
docker cp schema.sql mysql://root/
docker cp data.sql mysql://root/
C. 进入mysql容器命令行
docker exec -it mysql /bin/bash
然后执行
mysql -uroot -p"Yhf@1018" petclinic < /root/schema.sql
mysql -uroot -p"Yhf@1018" petclinic < /root/data.sql
exit

方案2. 等
由于使用了 --restart=always 参数,多次失败后最后会成功的,但是等待多久是无法事先预知的。
- She平台使用的registry.kinginsai.com作为镜像名称前缀,为什么这里打包使用r.kinginsai.com
因为前者是She平台内部组件使用,是经过严格测试的;而后者仅仅是测试案例中临时镜像使用,使用r.kinginsai.com可以避免这种混淆
基于nginx的水平扩展部署
1. 部署
注意:本部分内容需要学员完成本节之前的内容。
- 删除petclinic容器,保证干净的环境
docker stop petclinic && docker rm petclinic
- 部署petclinic1实例
docker run -d --name petclinic1 --restart=always -e spring.profiles.active=mysql -e spring_datasource_password=Yhf@1018 -e database_url="jdbc:mysql://$ip:3306/petclinic" -e app_id="1" r.kinginsai.com/petclinic:7.8.0
等待实例petclinic1启动完成
docker logs -f petclinic1
- 部署petclinic2实例
docker run -d --name petclinic2 --restart=always -e spring.profiles.active=mysql -e spring_datasource_password=Yhf@1018 -e database_url="jdbc:mysql://$ip:3306/petclinic" -e app_id="2" r.kinginsai.com/petclinic:7.8.0
等待实例petclinic2启动完成
docker logs -f petclinic2
- 获取实例petclinic1/petclinic2的ip地址
docker inspect --format '{{ .NetworkSettings.IPAddress }}' petclinic1
docker inspect --format '{{ .NetworkSettings.IPAddress }}' petclinic2
- 水平扩展/nginx负责均衡
在/root/petclinic目录下创建子目录conf.d,并在此目录下创建petclinic.conf文件
mkdir -p /root/petclinic/conf.d
touch /root/petclinic/conf.d/petclinic.conf
copy以下内容到/root/petclinic/conf.d/petclinic.conf
upstream backend {
    #server 192.168.1.101:8080 down;

    server 192.168.1.101:8080;
    server 192.168.1.102:8080;
}

server {
    listen       80;

    location / {
        proxy_pass http://backend/;
    }

}
然后将192.168.1.101/192.168.1.102分别改成实例petclinic1/petclinic2的ip地址
部署nginx(如果你的服务端没有外网条件,请加载nginx_1.25.1.tar)
docker run -d --name nginx -p 80:80 --restart=always -v /root/petclinic/conf.d:/etc/nginx/conf.d nginx:1.25.1
在浏览器中输入本台Ubuntu18TextVMI主机ip地址访问主页,并多次刷新查看结果。
2. nginx简单介绍
Nginx是一个高性能的HTTP和反向代理Web服务器,同时也提供IMAP/POP3/SMTP服务。Nginx是一款轻量级的Web服务器/反向代理服务器及电子邮件(IMAP/POP3/SMTP)代理服务器。Nginx的特点是:占有内存少,并发能力强。
Nginx专门为性能优化而开发,性能是最重要的考量,非常注重效率,事实上Nginx的并发能力在同类型的网页服务器种表现较好,能够支持高达50000个并发连接响应数。
正向代理
概念:正向代理,意思是一个位于客户端和原始服务器之间的服务器,为了从原始服务器取得内容,客户端向代理发送一个请求并指定目标(原始服务器),然后代理向原始服务器转交请求并将获得的内容返回给客户端。

客户端(浏览器)配置代理服务器,通过代理服务器进行互联网访问,这个过程就是正向代理。
反向代理
概念:反向代理服务器位于用户与目标服务器之间,但是对于用户而言,反向代理服务器就相当于目标服务器,即用户直接访问反向代理服务器就可以获得目标服务器的资源。
反向代理,其实对于客户端来说,对代理是无感知的,因为客户端不需要任何配置就可以访问。
过程:反向代理时,我们只需要将请求发送到反向代理服务器,由反向代理服务器去选择目标服务器获取数据后,将数据返回给客户端,此时反向代理服务器和目标服务器在外界看来就是一个服务器,暴露的是代理服务器,隐藏了真实服务器的IP地址。

端口号为5173的反向代理服务器根据客户端的请求,将请求转发到目标服务器的Tomcat中,但是在这个过程中,客户端直接访问的是端口号为5173的反向代理服务器,而不是Tomcat服务器,所以对外暴露的是反向代理服务器,而真正的内部服务器是端口号为8080的Tomcat。从客户端来看,客户端并不知道有反向代理服务器的存在,所以在外部看来,反向代理服务器5173和Tomcat服务器8080好像是一个服务器,也就是对外就是一个服务器。
负载均衡
概念:负载均衡其意思就是分摊到多个操作单元上进行执行,从而共同完成工作任务。
客户端发送请求到服务器,服务器处理请求,与数据库交互,服务区处理完成后,将结果响应给客户端。
客户端发送N条请求,上面我们了解到Nginx可以做反向代理,所以在这里,用户请求可以通过反向代理服务器,将N条请求平均分发到不同的服务器,不同端口号的服务器会得到反向代理服务器分发到不同请求信息进行处理。

Nginx负载均衡状态
状态	             概述
down	        当前的server暂时不参与负载均衡
backup	        预留的备份服务器
max_fails	    允许请求失败的次数
fail_timeout	经过max_fails次失败后,服务暂停的时间
max_conns	    限制最大的接收连接数
Nginx负载均衡策略
算法名称	  说明                  示例
轮询	    默认方式
weight	    权重方式               weight=10
ip_hash	    依据ip分配方式         ip_hash
least_conn	依据最少连接方式      least_conn
url_hash	依据URL分配方式       hash $request_uri
fair	    依据响应时间方式        fair
基于k8s的部署
注意:
A. 本部分内容需要学员完成本节之前的内容。
B. She平台服务端必须具备硬件虚拟化条件(可咨询老师)。
- 删除petclinic容器,保证干净的环境
docker stop petclinic1 && docker rm petclinic1
docker stop petclinic2 && docker rm petclinic2
- 删除mysql容器
docker stop mysql && docker rm mysql
- 启动k8s集群
cd /opt/tools/installK8s
然后运行启动脚本,
./installK8s.sh
一定保证以上命令执行完成才能关闭ssh连接,且以上命令仅可以执行一次,如果出错请重建此workspace然后从零开始。
执行过程如下,
root@ssxy:/opt/tools/installK8s# cd /opt/tools/installK8s
root@ssxy:/opt/tools/installK8s# ls
installK8s.sh  srcyamls
root@ssxy:/opt/tools/installK8s# ./installK8s.sh
W0809 15:24:15.314228    3125 configset.go:202] WARNING: kubeadm cannot validate component configs for API groups [kubelet.config.k8s.io kubeproxy.config.k8s.io]
[init] Using Kubernetes version: v1.18.3
[preflight] Running pre-flight checks
        [WARNING IsDockerSystemdCheck]: detected "cgroupfs" as the Docker cgroup driver. The recommended driver is "systemd". Please follow the guide at https://kubernetes.io/docs/setup/cri/
[preflight] Pulling images required for setting up a Kubernetes cluster
[preflight] This might take a minute or two, depending on the speed of your internet connection
[preflight] You can also perform this action in beforehand using 'kubeadm config images pull'
[kubelet-start] Writing kubelet environment file with flags to file "/var/lib/kubelet/kubeadm-flags.env"
[kubelet-start] Writing kubelet configuration to file "/var/lib/kubelet/config.yaml"
[kubelet-start] Starting the kubelet
[certs] Using certificateDir folder "/etc/kubernetes/pki"
[certs] Generating "ca" certificate and key
[certs] Generating "apiserver" certificate and key
[certs] apiserver serving cert is signed for DNS names [ssxy kubernetes kubernetes.default kubernetes.default.svc kubernetes.default.svc.cluster.local] and IPs [10.96.0.1 192.168.1.15]
[certs] Generating "apiserver-kubelet-client" certificate and key
[certs] Generating "front-proxy-ca" certificate and key
[certs] Generating "front-proxy-client" certificate and key
[certs] Generating "etcd/ca" certificate and key
[certs] Generating "etcd/server" certificate and key
[certs] etcd/server serving cert is signed for DNS names [ssxy localhost] and IPs [192.168.1.15 127.0.0.1 ::1]
[certs] Generating "etcd/peer" certificate and key
[certs] etcd/peer serving cert is signed for DNS names [ssxy localhost] and IPs [192.168.1.15 127.0.0.1 ::1]
[certs] Generating "etcd/healthcheck-client" certificate and key
[certs] Generating "apiserver-etcd-client" certificate and key
[certs] Generating "sa" key and public key
[kubeconfig] Using kubeconfig folder "/etc/kubernetes"
[kubeconfig] Writing "admin.conf" kubeconfig file
[kubeconfig] Writing "kubelet.conf" kubeconfig file
[kubeconfig] Writing "controller-manager.conf" kubeconfig file
[kubeconfig] Writing "scheduler.conf" kubeconfig file
[control-plane] Using manifest folder "/etc/kubernetes/manifests"
[control-plane] Creating static Pod manifest for "kube-apiserver"
[control-plane] Creating static Pod manifest for "kube-controller-manager"
W0809 15:24:24.656946    3125 manifests.go:225] the default kube-apiserver authorization-mode is "Node,RBAC"; using "Node,RBAC"
[control-plane] Creating static Pod manifest for "kube-scheduler"
W0809 15:24:24.658420    3125 manifests.go:225] the default kube-apiserver authorization-mode is "Node,RBAC"; using "Node,RBAC"
[etcd] Creating static Pod manifest for local etcd in "/etc/kubernetes/manifests"
[wait-control-plane] Waiting for the kubelet to boot up the control plane as static Pods from directory "/etc/kubernetes/manifests". This can take up to 4m0s
[apiclient] All control plane components are healthy after 30.011551 seconds
[upload-config] Storing the configuration used in ConfigMap "kubeadm-config" in the "kube-system" Namespace
[kubelet] Creating a ConfigMap "kubelet-config-1.18" in namespace kube-system with the configuration for the kubelets in the cluster
[upload-certs] Skipping phase. Please see --upload-certs
[mark-control-plane] Marking the node ssxy as control-plane by adding the label "node-role.kubernetes.io/master=''"
[mark-control-plane] Marking the node ssxy as control-plane by adding the taints [node-role.kubernetes.io/master:NoSchedule]
[bootstrap-token] Using token: 72cix0.diw72o8y0kmrlgua
[bootstrap-token] Configuring bootstrap tokens, cluster-info ConfigMap, RBAC Roles
[bootstrap-token] configured RBAC rules to allow Node Bootstrap tokens to get nodes
[bootstrap-token] configured RBAC rules to allow Node Bootstrap tokens to post CSRs in order for nodes to get long term certificate credentials
[bootstrap-token] configured RBAC rules to allow the csrapprover controller automatically approve CSRs from a Node Bootstrap Token
[bootstrap-token] configured RBAC rules to allow certificate rotation for all node client certificates in the cluster
[bootstrap-token] Creating the "cluster-info" ConfigMap in the "kube-public" namespace
[kubelet-finalize] Updating "/etc/kubernetes/kubelet.conf" to point to a rotatable kubelet client certificate and key
[addons] Applied essential addon: CoreDNS
[addons] Applied essential addon: kube-proxy

Your Kubernetes control-plane has initialized successfully!

To start using your cluster, you need to run the following as a regular user:

  mkdir -p $HOME/.kube
  sudo cp -i /etc/kubernetes/admin.conf $HOME/.kube/config
  sudo chown $(id -u):$(id -g) $HOME/.kube/config

You should now deploy a pod network to the cluster.
Run "kubectl apply -f [podnetwork].yaml" with one of the options listed at:
  https://kubernetes.io/docs/concepts/cluster-administration/addons/

Then you can join any number of worker nodes by running the following on each as root:

kubeadm join 192.168.1.15:6443 --token 72cix0.diw72o8y0kmrlgua \
    --discovery-token-ca-cert-hash sha256:a3e1223f80c1bd9e21866276f5cdd86c5e2c15842443b1ba3316fc30427c8cd1
node/ssxy untainted
configmap/calico-config created
customresourcedefinition.apiextensions.k8s.io/bgpconfigurations.crd.projectcalico.org created
customresourcedefinition.apiextensions.k8s.io/bgppeers.crd.projectcalico.org created
customresourcedefinition.apiextensions.k8s.io/blockaffinities.crd.projectcalico.org created
customresourcedefinition.apiextensions.k8s.io/clusterinformations.crd.projectcalico.org created
customresourcedefinition.apiextensions.k8s.io/felixconfigurations.crd.projectcalico.org created
customresourcedefinition.apiextensions.k8s.io/globalnetworkpolicies.crd.projectcalico.org created
customresourcedefinition.apiextensions.k8s.io/globalnetworksets.crd.projectcalico.org created
customresourcedefinition.apiextensions.k8s.io/hostendpoints.crd.projectcalico.org created
customresourcedefinition.apiextensions.k8s.io/ipamblocks.crd.projectcalico.org created
customresourcedefinition.apiextensions.k8s.io/ipamconfigs.crd.projectcalico.org created
customresourcedefinition.apiextensions.k8s.io/ipamhandles.crd.projectcalico.org created
customresourcedefinition.apiextensions.k8s.io/ippools.crd.projectcalico.org created
customresourcedefinition.apiextensions.k8s.io/kubecontrollersconfigurations.crd.projectcalico.org created
customresourcedefinition.apiextensions.k8s.io/networkpolicies.crd.projectcalico.org created
customresourcedefinition.apiextensions.k8s.io/networksets.crd.projectcalico.org created
clusterrole.rbac.authorization.k8s.io/calico-kube-controllers created
clusterrolebinding.rbac.authorization.k8s.io/calico-kube-controllers created
clusterrole.rbac.authorization.k8s.io/calico-node created
clusterrolebinding.rbac.authorization.k8s.io/calico-node created
daemonset.apps/calico-node created
serviceaccount/calico-node created
deployment.apps/calico-kube-controllers created
serviceaccount/calico-kube-controllers created
node/ssxy condition met
deployment.apps/coredns scaled
pod/coredns-66bff467f8-9gmft condition met
pod/coredns-66bff467f8-kdvk9 condition met
deployment.apps/coredns scaled
pod/coredns-66bff467f8-wjpsd condition met
pod/calico-kube-controllers-598fbdf98b-nhmmq condition met
pod/calico-node-pnl5h condition met
namespace/local-path-storage created
serviceaccount/local-path-provisioner-service-account created
clusterrole.rbac.authorization.k8s.io/local-path-provisioner-role created
clusterrolebinding.rbac.authorization.k8s.io/local-path-provisioner-bind created
deployment.apps/local-path-provisioner created
storageclass.storage.k8s.io/local-path created
configmap/local-path-config created
storageclass.storage.k8s.io/local-path patched
namespace/ingress-nginx created
configmap/nginx-configuration created
configmap/tcp-services created
configmap/udp-services created
serviceaccount/nginx-ingress-serviceaccount created
clusterrole.rbac.authorization.k8s.io/nginx-ingress-clusterrole created
role.rbac.authorization.k8s.io/nginx-ingress-role created
rolebinding.rbac.authorization.k8s.io/nginx-ingress-role-nisa-binding created
clusterrolebinding.rbac.authorization.k8s.io/nginx-ingress-clusterrole-nisa-binding created
deployment.apps/nginx-ingress-controller created
limitrange/ingress-nginx created
service/ingress-nginx created
namespace/metallb-system created
podsecuritypolicy.policy/controller created
podsecuritypolicy.policy/speaker created
serviceaccount/controller created
serviceaccount/speaker created
clusterrole.rbac.authorization.k8s.io/metallb-system:controller created
clusterrole.rbac.authorization.k8s.io/metallb-system:speaker created
role.rbac.authorization.k8s.io/config-watcher created
role.rbac.authorization.k8s.io/pod-lister created
clusterrolebinding.rbac.authorization.k8s.io/metallb-system:controller created
clusterrolebinding.rbac.authorization.k8s.io/metallb-system:speaker created
rolebinding.rbac.authorization.k8s.io/config-watcher created
rolebinding.rbac.authorization.k8s.io/pod-lister created
daemonset.apps/speaker created
deployment.apps/controller created
secret/memberlist created
configmap/config created
NAME            TYPE           CLUSTER-IP     EXTERNAL-IP   PORT(S)                      AGE
ingress-nginx   LoadBalancer   10.108.8.115   <pending>     80:31151/TCP,443:30487/TCP   5s
All Finished.
root@ssxy:/opt/tools/installK8s#
- 部署
A. 先部署petclinic应用,
cd ~/petclinic
touch petclinic.yaml
向petclinic.yaml输入
apiVersion: apps/v1
kind: Deployment
metadata:
  name: mysql
  labels:
    app: mysql
spec:
  replicas: 1
  selector:
    matchLabels:
      app: mysql
  template:
    metadata:
      labels:
        app: mysql
    spec:
      containers:
      - image: mysql:5.7-debian
        name: mysql
        imagePullPolicy: IfNotPresent
        ports:
        - containerPort: 3306
          name: dbport
        env:
        - name: MYSQL_ROOT_PASSWORD
          value: Yhf@1018
        - name: MYSQL_DATABASE
          value: petclinic

---

apiVersion: v1
kind: Service
metadata:
  name: mysql
spec:
  selector:
    app: mysql
  ports:
  - name: mysqlport
    protocol: TCP
    port: 3306
    targetPort: dbport

---
apiVersion: apps/v1
kind: Deployment
metadata:
  name: petclinic1
spec:
  selector:
    matchLabels:
      run: petclinic1
  template:
    metadata:
      labels:
        run: petclinic1
    spec:
      initContainers:
      - name: db-init
        image: registry.kinginsai.com/busybox:1.33.1
        command: ['sh', '-c', 'echo -e "Checking MySQL"; while ! nc -z mysql 3306; do sleep 1; printf "-"; done; echo -e "  >> MySQL DB Server has started";']
      containers:
      - name: petclinic1
        image: r.kinginsai.com/petclinic:7.8.0
        imagePullPolicy: IfNotPresent
        env:
        - name: spring.profiles.active
          value: "mysql"
        - name: spring_datasource_password
          value: "Yhf@1018"
        - name: database_url
          value: "jdbc:mysql://mysql:3306/petclinic"
        - name: app_id
          value: "1"
        ports:
        - name: http
          containerPort: 8080

---
apiVersion: v1
kind: Service
metadata:
  name: petclinic1
spec:
  selector:
    run: petclinic1
  ports:
  - name: petclinic1port
    protocol: TCP
    port: 8080
    targetPort: 8080

---
apiVersion: apps/v1
kind: Deployment
metadata:
  name: petclinic2
spec:
  selector:
    matchLabels:
      run: petclinic2
  template:
    metadata:
      labels:
        run: petclinic2
    spec:
      initContainers:
      - name: db-init
        image: registry.kinginsai.com/busybox:1.33.1
        command: ['sh', '-c', 'echo -e "Checking MySQL"; while ! nc -z mysql 3306; do sleep 1; printf "-"; done; echo -e "  >> MySQL DB Server has started";']
      containers:
      - name: petclinic2
        image: r.kinginsai.com/petclinic:7.8.0
        imagePullPolicy: IfNotPresent
        env:
        - name: spring.profiles.active
          value: "mysql"
        - name: spring_datasource_password
          value: "Yhf@1018"
        - name: database_url
          value: "jdbc:mysql://mysql:3306/petclinic"
        - name: app_id
          value: "2"
        ports:
        - name: http
          containerPort: 8080

---
apiVersion: v1
kind: Service
metadata:
  name: petclinic2
spec:
  selector:
    run: petclinic2
  ports:
  - name: petclinic2port
    protocol: TCP
    port: 8080
    targetPort: 8080
然后运行部署命令
kubectl apply -f petclinic.yaml -n default
注:如果遇到部署错误使用以下命令删除部署
kubectl delete -f petclinic.yaml -n default
使用以下命令等待以上部署完成
root@ssxy:~/petclinic# kubectl get pods -n default
NAME                          READY   STATUS     RESTARTS   AGE
mysql-846d894c6c-qlqxq        1/1     Running    0          2m11s
petclinic1-b774d4d4c-vnmw5    0/1     Init:0/1   0          2m11s
petclinic2-5f8db4885d-9scm6   0/1     Init:0/1   0          2m11s
B. 部署nginx
cd ~/petclinic
touch nginx.yaml
nginx.yaml输入
apiVersion: apps/v1
kind: Deployment
metadata:
  name: nginx
  labels:
    app: nginx
spec:
  replicas: 1
  selector:
    matchLabels:
      app: nginx
  template:
    metadata:
      labels:
        app: nginx
    spec:
      containers:
      - image: nginx:1.25.1
        name: nginx
        imagePullPolicy: IfNotPresent
        ports:
        - containerPort: 80
          name: nginxport
        volumeMounts:
        - name: web-nginx-config
          mountPath: /etc/nginx/nginx.conf
          subPath: nginx.conf
      volumes:
        - name: web-nginx-config
          configMap:
            name: web-nginx-config
            items:
            - key: nginx.conf
              path: nginx.conf

---

apiVersion: v1
kind: ConfigMap
metadata:
    name: web-nginx-config
data:
  nginx.conf: |
    user  nginx;
    worker_processes  1;

    error_log  /var/log/nginx/error.log warn;
    pid        /var/run/nginx.pid;


    events {
        worker_connections  1024;
    }


    http {
        include       /etc/nginx/mime.types;
        default_type  application/octet-stream;

        log_format  main  '$remote_addr - $remote_user [$time_local] "$request" '
                          '$status $body_bytes_sent "$http_referer" '
                          '"$http_user_agent" "$http_x_forwarded_for"';

        access_log  /var/log/nginx/access.log  main;

        sendfile        on;
        #tcp_nopush     on;

        keepalive_timeout  65;

        #gzip  on;

        upstream backend {
            #server 192.168.1.101:8080 down;

            server petclinic1:8080;
            server petclinic2:8080;
        }

        server {
            listen       80;

            location / {
                proxy_pass http://backend/;
            }

        }
    }

---
apiVersion: v1
kind: Service
metadata:
  name: web-nginx
  labels:
    app: web-nginx
spec:
  ports:
  - port: 80
    name: web
  clusterIP: None
  selector:
    app: nginx
---
apiVersion: v1
kind: Service
metadata:
  name: web-nginx-out
spec:
  type: NodePort
  sessionAffinity: ClientIP
  ports:
    - name: web-nginx-out
      port: 80
      targetPort: 80
      nodePort: 30080
  selector:
    app: nginx
然后运行部署命令
kubectl apply -f nginx.yaml -n default
注:如果遇到部署错误使用以下命令删除部署
kubectl delete -f nginx.yaml -n default
在远端浏览器中输入 Ubuntu18TextVMI主机IP地址:30080, 浏览网页
网站操作提示
1. 操作提示
对于使用微信点击链接的方式访问的用户
-
点击红色框的图标可以展开/关闭左侧导航栏。
-
在绿色导航栏中触摸滑动可以看见更多导航菜单。
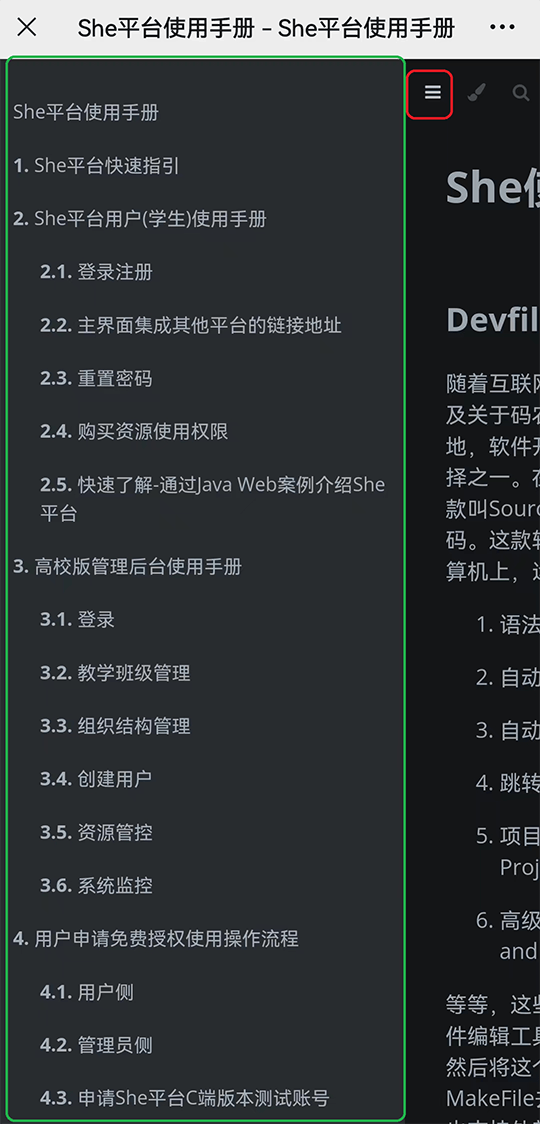
-
这里提及的地址 http://she.kinginsai.com、http://she-she.dev.kinginsai.com 均为She平台C端版本地址,对于部署了She平台的高校用户,请使用私有部署的地址。
-
由于微信可能会有网页缓存,可以点击页面刷新获取最新内容。手册、课程平台等会不定期更新,如果您的微信页面缓存时间正好在更新周期内、则可能浏览的是过期的页面内容。

关于视频清晰度问题
所有视频都是高清的,由于网络等综合原因,可能有时打开课程、手册中的视频时清晰度非常差,此时请反复调节视频播放的清晰度以获取高清界面,如高清->标清->高清。
学苑网课中心
松鼠学苑发展历程

主营业务

She教研解决方案
1、远端浏览器,从Google、GitHub、Maven等获取技术资源不再有羁绊。
2、基于Devfile的、一键式、无差别构建,基于账号的隔离独享环境,基于浏览器的全新开发模式,让你和你的 小伙伴的软件工程环境精准的一致,而且能随心所欲的创建一个新的属于你的环境。
3、全系列、分步骤镜像,让你的大数据能够从任一成功阶段继续,从裸Linux到Zookeeper、Hadoop、Tez、 Hive、Spark、Oozie、HBase,到Kafka、Flink、Ambari,All in One的Jupyter,最新版本的TensorFlow, 使用你擅长的任一语言,Python、Java、Scala、R、Julia。
4、无需任何配置,只要bind任一端口,你的应用便自动地expose出去,自动配置域名。
She平台架构

She是构建在docker/k8s之上、用于软件开发调试的大数据平台,平 台本身是架构在大数据集群之上的分布式系统,包括三层:计算资源管 理层、She核心调度层、应用层,应用层集合了所有课程环境,Devfile 和Workspace是其中两个核心概念:
1.Devfile是开展某项软件类开发任务所需环境的定义,那么将这个草稿 建设起来的就是Workspace,即Workspace是物理的、而Devfile是逻辑 的、是静态的:Workspace包括了物理上运行的各容器或物理机实体、端 口、命名等一干看得见摸得着的资源,所以Devfile定义了某个实训任务 的资源需求情况,如CPU、GPU、Memory、Disk等,而运行中的Work space的则实际占有了这些资源,因此,从这个意义上看,具体的实训 任务决定了She平台的硬件配置需求。
2.Devfile是She平台的预置环境,即其对应的Workspace中已经安装了 一系列版本号确定的工具,这些工具集的选择是根据这项开发任务的通 用需求而定的,是通用的;但是我们可以根据需要卸载、升级、安装相 应工具。
HFS三节点集群拓扑结构

为了降低实训成本,我们以三节点为例搭建HFS集群,但这个集群理论上可以水平扩展到10万点的规模。